Compartment Syndrome, is usually straightforward to pick up. How do we measure Compartment pressures? Below is a MacGyver setup.
CASE
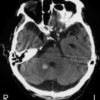
A 21 yo male presents to the emergency department with a very painful leg.
He was tackled to the right lower leg the day before, in a game of football. He continued to play at that time. The pain became worst. During the evening the pain worsened and it was there at rest and extremely severe, when placing any weight on the leg
On examination there is numbness to the right foot and swelling of the distal leg.
You are concerned about compartment syndrome.
SYMPTOMS AND SIGNS OF COMPARTMENT SYNDROME
•Pain out of proportion to clinical situation is usually first symptom
•Pain on passive stretch is the most sensitive finding prior to onset of ischaemia
•Paraesthesia is indicative of nerve ischaemia in the affected compartment
•Paralysis is a late finding – full recovery is rare
•Palpable swelling
•Peripheral pulses absent, is a late finding and amputation may be inevitable
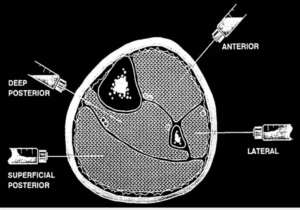
COMPARTMENTS OF THE CALF
WHAT ARE THE COMPARTMENT PRESSURES?
•Normal tissue pressure is 0-10 mmHg.
•Capillary blood flow within the compartment is compromised at pressures > 20 mmHg.
•Muscle and nerve fibres are at risk for ischaemic necrosis at pressures >30 to 40mmHg.
•There is a trend towards using delta pressures, to determine if compartment syndrome is present.
ie., DELTA PRESSURE = Diastolic BP – Compartment pressure
A DELTA of < 30 indicates a significant compartment pressure rise.
HOW TO MEASURE PRESSURES
Usually a formal measuring device such a ‘Stryker’ manometer is needed. I know my hospital doesn’t have one.
What if you don’t have one?
1. You can use an arterial line into the compartment or
2. You can make your own pressure manometer, like the one we MacGyvered below. The accurateness cannot be guaranteed however.
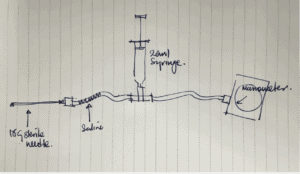
Here’s the MacGyver Setup
You need a cannula with some tubing that attaches to a 3 way tap. More tubing attaches to manometer. Between the two bits of tubing we attach the three way tap and a20ml syringe with air.
Here is the Process:
- Connect the tubing as shown in the diagram below.
- The tubing running to the cannula must have sterile saline in it, but not all the way up to the three way tap.
- Flush it so that some passes through the cannula and it is primed
- Insert the cannula into the compartment.
- Open the three way tap so there is communication between the two sides of the tubing and the syringe(see picture below)
- Push the plunger in the syringe gently(remember there is air in the syringe). The aim is to push the water column into the compartment. When the water just starts to move towards the cannula, it means that this is the pressure needed to overcome the compartment pressure. You can read the pressure on the manometer. (beware as this technique may be inaccurate)
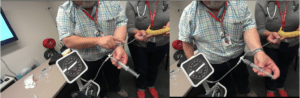
Above you can see me pointing to the water in the tubing We are testing the compartment pressure of a banana here. We press down on the syringe. When the water column starts to move, that is the pressure needed to overcome the pressure within the banana. We can see that the pressure in the banana is 65mmHg. This banana needs a fasciotomy!
What happened to the patient?
He was taken to the operating theatre for an emergency fasciotomy. The tibialis anterior was swollen and bruised but no ischemia or haematoma was present. In the deep compartment, the FDL was bulging and the overlying fascia was tight but the muscle was normal and there was no haematoma.
Post operatively there was reduced pain and normal sensation. 48hours later: the wound was closed. 3 days later the patient was discharged home.